
So, you've decided to tackle the electrifying world of illuminated push buttons, huh? Brave soul! It's not as simple as sticking a fork in a toaster, but with a little patience (and maybe a fire extinguisher nearby, just in case), you too can illuminate the void... or at least a tiny little button.
Wiring an Illuminated 5 pin Momentary Push Button – It's not Rocket Science (But Almost!)

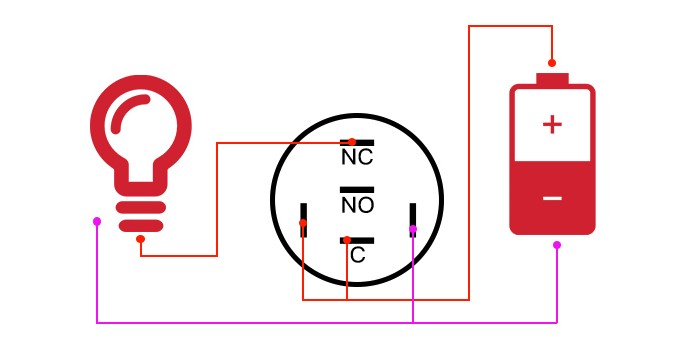
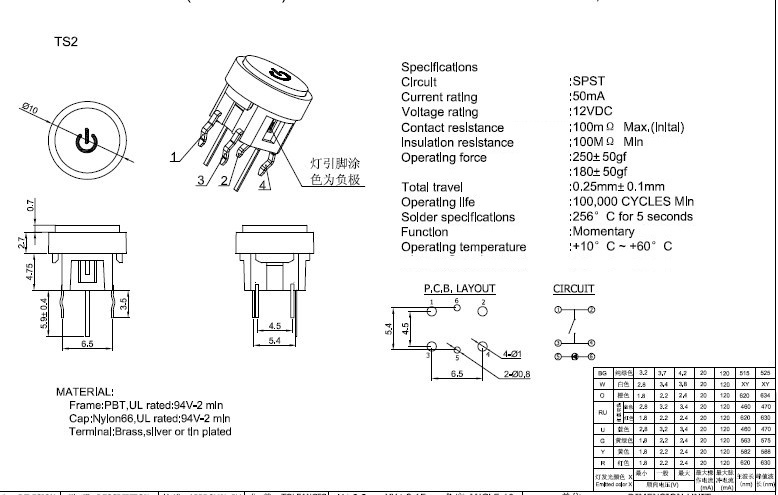
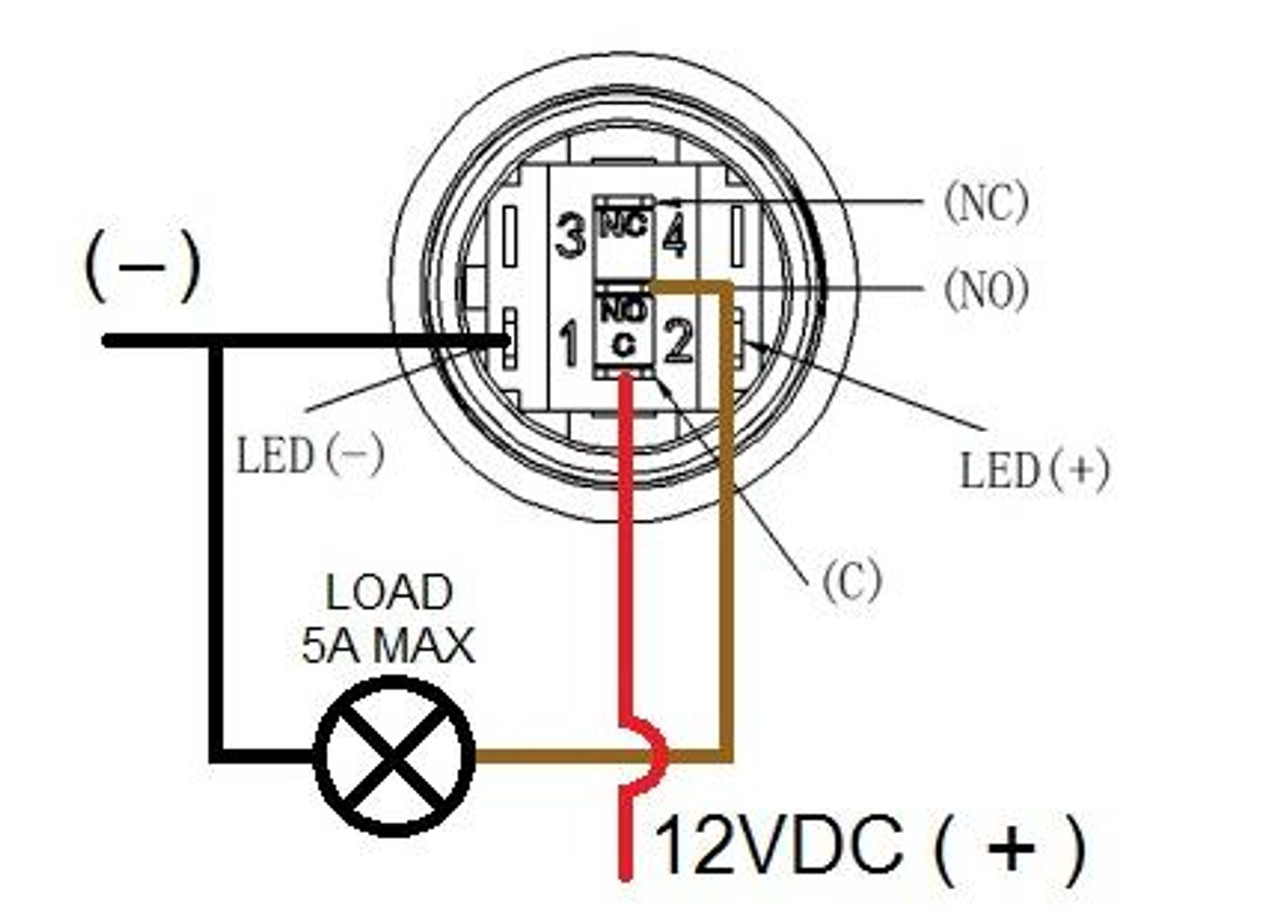
Five pins! Five! It's like they *want* to confuse you. Don't worry, we'll break it down. Think of each pin as a tiny, electronic diplomat, each with their own important role. You’ve got your power pins, your ground pins, and the all-important signal pin, which is the one that actually, you know, *does* something. Trying to remember which pin is which is like trying to remember which Kardashian is which – utterly bewildering at first, but eventually you just pick one and hope for the best (don't actually do that with the wiring, though... sparks will fly).
The key is to consult the wiring diagram, that sacred text of the DIY electrical enthusiast. These diagrams are often drawn by engineers who, bless their hearts, seem to operate on a level of abstract thought that mere mortals can barely comprehend. They’re filled with symbols that look suspiciously like hieroglyphics from some ancient, technologically advanced civilization. But fear not! With a magnifying glass, a strong cup of coffee, and perhaps a sympathetic neighbor who actually knows what they're doing, you can decipher the cryptic messages. Just remember, red is generally positive, black is generally negative, and if anything starts smoking, unplug it immediately!
Once you've successfully navigated the pin-filled labyrinth and connected all the wires correctly (fingers crossed!), you'll be rewarded with a beautiful, glowing beacon of accomplishment. A tiny, illuminated monument to your electrical prowess. It's at this point that you can confidently proclaim to the world, "I wired a push button! And I only mildly electrocuted myself!" (Okay, maybe don't say that last part out loud.)
Push Button Wiring Diagram – A Simpler Approach (Hopefully!)

Okay, so maybe five pins was a little ambitious. Let's take a step back and look at a slightly simpler wiring diagram. This one features fewer pins, fewer wires, and hopefully, fewer opportunities for catastrophic electrical failure. The principles are still the same: you need to connect the power, the ground, and the signal. The good news is, with fewer pins, there's less chance of accidentally wiring things backwards and turning your push button into a miniature lightning rod. Unless you're *really* trying to do that, in which case, I'm not judging... but please do it outside.
Remember to always, *always*, **ALWAYS** disconnect the power source before you start fiddling with wires. Electricity is a powerful force, and it has a nasty habit of turning unsuspecting DIY-ers into crispy critters. And for the love of all that is holy, don't try to do this in the bathtub. Common sense, people!
The real trick is to take your time, double-check your connections, and don't be afraid to ask for help. There are plenty of online resources, YouTube tutorials, and even real-life human beings who can offer guidance and assistance. Just remember to approach them with a healthy dose of humility and a willingness to admit that you have absolutely no idea what you're doing. They'll appreciate it, trust me.
And when you're finished, and that little button glows, you'll know that you've conquered the electrical beast. Or at least, you've managed to wire a push button without burning down your house. Either way, it's a victory worth celebrating!
If you are searching about How to Wire an Illuminated Push Button: Step-by-Step Diagram you've came to the right place. We have 25 Images about How to Wire an Illuminated Push Button: Step-by-Step Diagram like Illuminated Push Button Wiring Diagram Illuminated Pu - vrogue.co, Wiring an Illuminated 5 pin Momentary Push Button • VapOven and also How to Properly Wire and Install an Illuminated Push Button: A Step-by. Here it is:
How To Wire An Illuminated Push Button: Step-by-Step Diagram
 design1systems.com
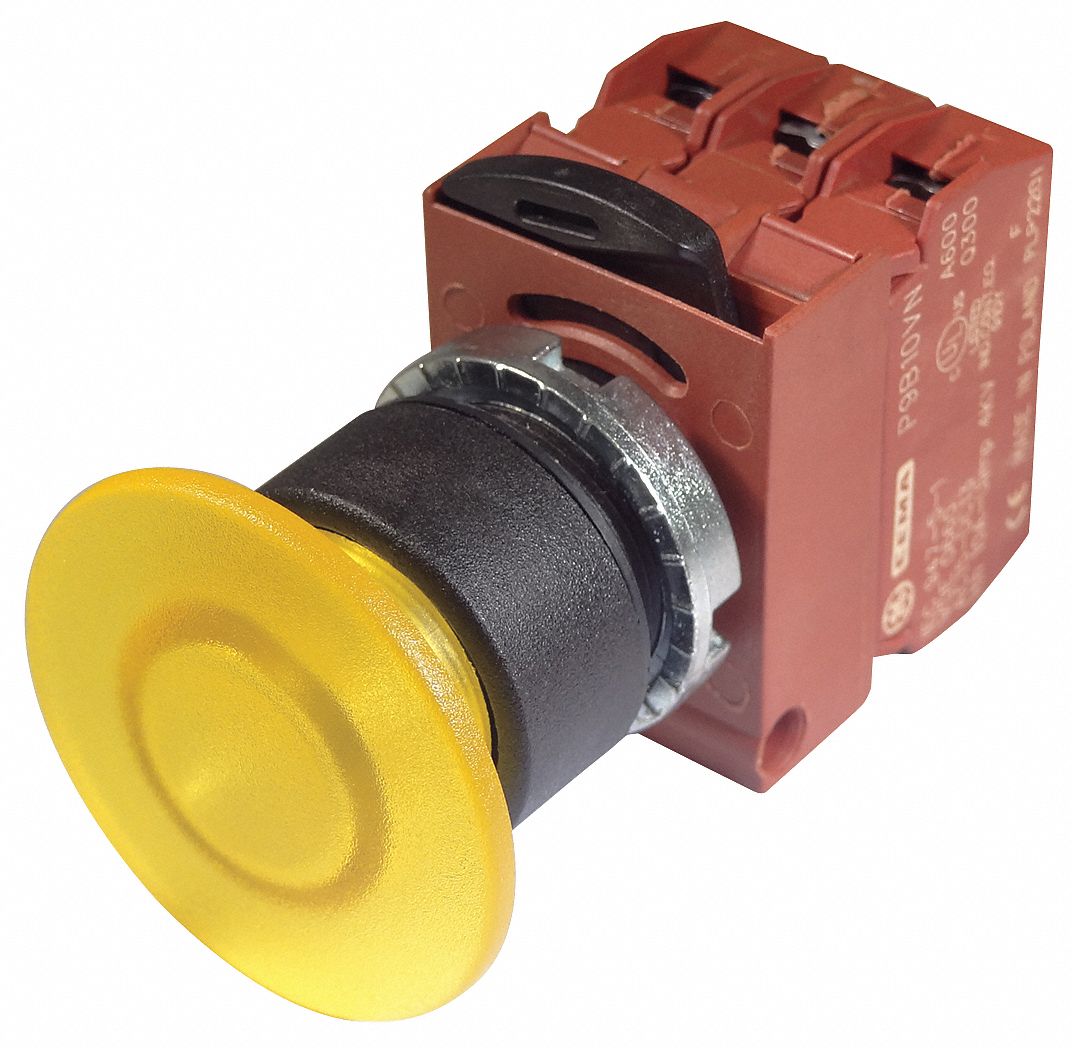
 ABB Illuminated Push Button, 22 Mm, Momentary, 40mm Mushroom Head
 www.grainger.com
 Illuminated Push Button Switch, Momentary & Latching
 www.langirswitch.com
 Wiring An Illuminated 5 Pin Momentary Push Button • VapOven
 vapoven.com
 illuminated momentary wiring spst rocker also
Push Button Wiring Diagram
stewart-switch.com Push Button Starter Wiring Diagram
 stewart-switch.com
 How To Wiring Waterproof Illuminated Push Button Switch - L&G Electronics
 www.lgswitch.com
 How To Properly Wire And Install An Illuminated Push Button: A Step-by
 techdiagrammer.com
 Wiring An Illuminated 5 Pin Momentary Push Button • VapOven
vapoven.com illuminated button push wiring momentary an pin switch diagram rocker here spst kit also there buttons
How To Properly Wire And Install An Illuminated Push Button: A Step-by
 techdiagrammer.com
 How To Wire An Illuminated Push Button Switch: A Comprehensive Wiring
 design1systems.com
 How To Wire An Emergency Push Button: A Step-by-Step Diagram
 autoctrls.com
 How To Wire An Illuminated Push Button Switch: A Comprehensive Wiring
 design1systems.com
 Wiring Diagram For Illuminated Push Buttons
 wirecrafted.com
 How To Properly Wire And Install An Illuminated Push Button: A Step-by
 techdiagrammer.com
 How To Wire An Emergency Push Button: A Step-by-Step Diagram
 autoctrls.com
 Wiring Diagram For Illuminated Push Buttons
 wirecrafted.com
 How To Properly Wire And Install An Illuminated Push Button: A Step-by
 techdiagrammer.com
 Push Button Wiring Diagram
 stewart-switch.com
 Wiring Diagram For Illuminated Push Buttons
 wirecrafted.com
 Illuminated Push Button Switch Wiring Diagram
 circuitlibraryloren.z4.web.core.windows.net
 Illuminated Push Button Wiring Diagram Illuminated Pu - Vrogue.co
 www.vrogue.co
 Illuminated Push Button Switch Wiring Diagram
 circuitlibraryloren.z4.web.core.windows.net
 How To Wire An Illuminated Push Button: Step-by-Step Diagram
 design1systems.com
 How To Wire An Illuminated Push Button: Step-by-Step Diagram
 design1systems.com
 Wiring diagram for illuminated push buttons. Illuminated push button switch wiring diagram. How to wire an illuminated push button switch: a comprehensive wiring